Configuración do cliente LDAP. vello
Neste apartado veremos os pasos que temos que seguir para configurar un equipo como cliente LDAP, de forma que o equipo tomará os usuarios e grupo do LDAP como usuarios e grupo do sistema, e autentificará os usuarios que inicien sesión validándose contra o servidor LDAP.
Polo tanto, teremos que realizar esta configuración en todos os equipos que pertenzan ao noso dominio, incluíndo (e moi especialmente) ao servidor de dominio (no que se executa o servidor LDAP), xa que senón os usuarios e grupos do LDAP non serán válidos para el mesmo, aínda que sexa o que almacena a información do directorio.
Instalar os paquetes necesarios
Instalaremos o paquete libnss-ldap
sudo apt-get install libnss-ldap
A instalación deste paquete obrigará tamén a instalación do paquete ldap-auth-config, que permite configurar a autentificación do equipo contra un servidor LDAP. Lanzarase automaticamente un asistente para configurar a conexión co servidor LDAP:
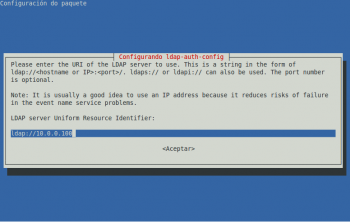
Introducimos a URL da conexión do servidor LDAP (ldap://IPServidor). OLLO: ldap non ldapi e 2 / e non 3 /, isto é ladp:// e non ldap:///.
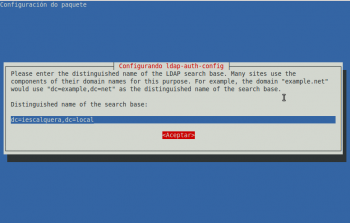
Introducimos a rama base na que se atopan os usuarios e grupos no directorio.
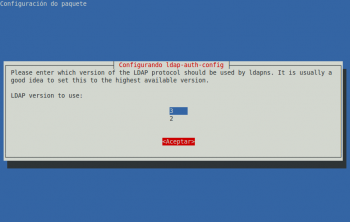
Seleccionamos a versión 3 do protocolo LDAP.
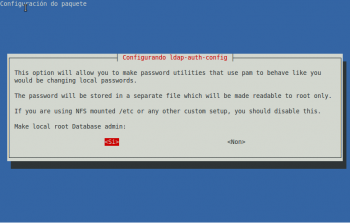
Se queremos que os usuarios poidan cambiar o seu contrasinal dende os equipos cliente, teremos que activar a opción de introducir os datos do administrador do LDAP. Ollo, que nun caso real haberá que valorar se nos interesa ou non esta opción, xa que o contrasinal do administrador do LDAP almacénase, só accesible para o usuario root, no ficheiro /etc/ldap.secret, pero arrancando o equipo con un live-CD e montando a partición de sistema de Ubuntu, calquera podería ver este contrasinal.
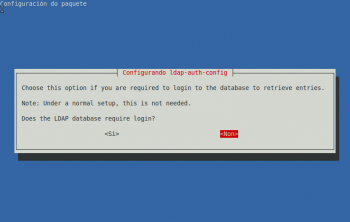
Deixamos marcada a opción que indica que o servidor LDAP non require login para facer buscas no directorio.
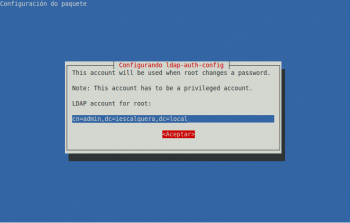
Introducimos o dn do administrador do LDAP.
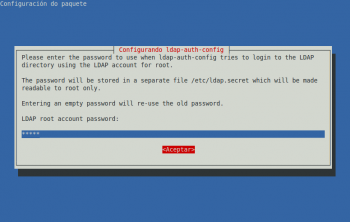
Introducimos o contrasinal do administrador do LDAP (No caso do noso exemplo é admin).


Se cometésemos algún erro introducindo os datos de conexión pódese reconfigurar o paquete ldap-auth-config co mesmo asistente introducindo o seguinte comando:
sudo dpkg-reconfigure ldap-auth-config
Ficheiro de configuración /etc/ldap.conf
No ficheiro /etc/ldap.conf pódese ver e modificar a configuración do cliente ldap. Observar as seguintes entradas:
- base
- uri
- rootbinddn
- pam_password
###DEBCONF###
##
## Configuration of this file will be managed by debconf as long as the
## first line of the file says '###DEBCONF###'
##
## You should use dpkg-reconfigure to configure this file via debconf
##

#
# @(#)$Id: ldap.conf,v 1.38 2006/05/15 08:13:31 lukeh Exp $
#
# This is the configuration file for the LDAP nameservice
# switch library and the LDAP PAM module.
#
# PADL Software
# http://www.padl.com
#

# Your LDAP server. Must be resolvable without using LDAP.
# Multiple hosts may be specified, each separated by a
# space. How long nss_ldap takes to failover depends on
# whether your LDAP client library supports configurable
# network or connect timeouts (see bind_timelimit).
#host 127.0.0.1

# The distinguished name of the search base.
base dc=iescalquera,dc=local

# Another way to specify your LDAP server is to provide an
uri ldap://10.0.0.100
# Unix Domain Sockets to connect to a local LDAP Server.
#uri ldap://127.0.0.1/
#uri ldaps://127.0.0.1/
#uri ldapi://%2fvar%2frun%2fldapi_sock/
# Note: %2f encodes the '/' used as directory separator

# The LDAP version to use (defaults to 3
# if supported by client library)
ldap_version 3

# The distinguished name to bind to the server with.
# Optional: default is to bind anonymously.
#binddn cn=proxyuser,dc=padl,dc=com

# The credentials to bind with.
# Optional: default is no credential.
#bindpw secret

# The distinguished name to bind to the server with
# if the effective user ID is root. Password is
# stored in /etc/ldap.secret (mode 600)
rootbinddn cn=admin,dc=iescalquera,dc=local

# The port.
# Optional: default is 389.
#port 389

# The search scope.
#scope sub
#scope one
#scope base

# Search timelimit
#timelimit 30

# Bind/connect timelimit
#bind_timelimit 30

# Reconnect policy: hard (default) will retry connecting to
# the software with exponential backoff, soft will fail
# immediately.
#bind_policy hard

# Idle timelimit; client will close connections
# (nss_ldap only) if the server has not been contacted
# for the number of seconds specified below.
#idle_timelimit 3600

# Filter to AND with uid=%s
#pam_filter objectclass=account

# The user ID attribute (defaults to uid)
#pam_login_attribute uid

# Search the root DSE for the password policy (works
# with Netscape Directory Server)
#pam_lookup_policy yes

# Check the 'host' attribute for access control
# Default is no; if set to yes, and user has no
# value for the host attribute, and pam_ldap is
# configured for account management (authorization)
# then the user will not be allowed to login.
#pam_check_host_attr yes

# Check the 'authorizedService' attribute for access
# control
# Default is no; if set to yes, and the user has no
# value for the authorizedService attribute, and
# pam_ldap is configured for account management
# (authorization) then the user will not be allowed
# to login.
#pam_check_service_attr yes

# Group to enforce membership of
#pam_groupdn cn=PAM,ou=Groups,dc=padl,dc=com

# Group member attribute
#pam_member_attribute uniquemember

# Specify a minium or maximum UID number allowed
#pam_min_uid 0
#pam_max_uid 0

# Template login attribute, default template user
# (can be overriden by value of former attribute
# in user's entry)
#pam_login_attribute userPrincipalName
#pam_template_login_attribute uid
#pam_template_login nobody

# HEADS UP: the pam_crypt, pam_nds_passwd,
# and pam_ad_passwd options are no
# longer supported.
#
# Do not hash the password at all; presume
# the directory server will do it, if
# necessary. This is the default.
pam_password crypt

# Hash password locally; required for University of
# Michigan LDAP server, and works with Netscape
# Directory Server if you're using the UNIX-Crypt
# hash mechanism and not using the NT Synchronization
# service.
#pam_password crypt

# Remove old password first, then update in
# cleartext. Necessary for use with Novell
# Directory Services (NDS)
#pam_password clear_remove_old
#pam_password nds

# RACF is an alias for the above. For use with
# IBM RACF
#pam_password racf

# Update Active Directory password, by
# creating Unicode password and updating
# unicodePwd attribute.
#pam_password ad

# Use the OpenLDAP password change
# extended operation to update the password.
#pam_password exop

# Redirect users to a URL or somesuch on password
# changes.
#pam_password_prohibit_message Please visit http://internal to change your password.
...
Configurar o cliente LDAP
Agora teremos que configurar o equipo para que use a conexión co servidor LDAP que xa temos configurada para tomar os usuarios e grupos do sistema. Usaremos o comando auth-client-config:
sudo auth-client-config -t nss -p lac_ldap
Se visualizamos o ficheiro /etc/nsswitch.conf veremos que con este comando modificáronse as seguinte liñas:
passwd:         files ldap
group:          files ldap
shadow:         files ldap
que lle di ao noso sistema que tome os usuarios en primeiro lugar dos ficheiros locais de usuarios e grupos, e a continuación do servidor LDAP.
Por último, o comando pam-auth-update serve para indicar que servizos vai usar o sistema para autenticar os usuarios. Podemos executalo para comprobar que está xa activado o LDAP (polo que, en realidade, non hai por que executar este comando):
sudo pam-auth-update
Podemos ver a continuación a pantalla que mostra este comando:

Probar o funcionamento do cliente
Temos dúas formas sinxelas de comprobar que a configuración do cliente é correcta e toma realmente os usuarios do servidor:
- Usar o comando getent passwd: Este comando mostra pola pantalla todos os usuarios do sistema, tomándoos das diversas fontes que pode ter configuradas. No noso caso, deberían aparecer ao final os usuarios LDAP. A continuación pódese ver a última parte do resultado deste comando, no que aparece o usuario alfredo do LDAP:
administrador:x:1000:1000:administrador,,,:/home/administrador:/bin/bash
sshd:x:103:65534::/var/run/sshd:/usr/sbin/nologin
openldap:x:104:112:OpenLDAP Server Account,,,:/nonexistent:/bin/false
alfredo:x:10000:10000:Alfredo Perez:/home/alfredo:/bin/bash
- Iniciar sesión no equipo cliente con un usuario do LDAP: Deberemos iniciar a sesión en modo de texto, non en modo gráfico, iso verase na parte III do curso, (utilizando por exemplo unha consola virtual, premendo nas teclas Control+Alt+F1, e poderemos volver ao contorno gráfico premendo Control+Alt+F7), xa que ao non existir no equipo cliente a carpeta persoal do usuario, se intentamos iniciar unha sesión en modo gráfico produciranse unha serie de erros impedirán o inicio de sesión (Solucionaremos este problema con NFS máis adiante).