Tutorial sobre editor Sublime Text 3
Editor Sublime Text 3 (ST3)
Sublime 3 es un editor de código muy rápido y sofisticado que nos permitirá ejecutar un montón de tareas de forma muy rápida y sencilla. Soporte muchos lenguajes de programación y dispone de un sistema de instalación de paquetes adiciones que amplían sus características de forma ilimitada.
- Página Oficial: http://www.sublimetext.com
- Documentación Oficial: http://www.sublimetext.com/docs/3/
Instalación de Sublime Text 3
- Para Instalar Sublime 3 tendremos que ir a la página http://www.sublimetext.com
- Descargaremos el paquete de instalación para nuestra versión de sistema operativo (actualmente Sublime Text está en versión Beta) http://www.sublimetext.com/3
- Disponemos de versiones para OSX, Windows(32 y 64 bits) y Ubuntu (32 y 64 bits).
- Seguimos los pasos indicados en la instalación.
Combinaciones de teclas y funciones básicas en Sublime Text 3
Selección múltiple
- Pulsando Ctrl + D, seleccionamos la próxima ocurrencia de la palabra/string que tenemos seleccionada.
- Pulsando Ctrl + L, seleccionamos la próxima linea.
- Pulsando Ctrl y utilizando el ratón, podemos seleccionar lo que queramos.
Linea de Comandos
- Pulsando Ctrl + Shift + P podemos abrir la linea de comandos, desde la cual podemos hacer de todo.. desde insertar snippets.. cambiar configuraciones a cambiar de lenguaje.
Movernos por el código
- Pulsando Ctrl + P, podemos navegar por el source del archivo abierto, por otros archivos y etc..
- Pulsando Ctrl + R, puedes encontrar los metodos/funciones de tu documento.
- Si pulsamos Ctrl + G, y escribimos un número, nos llevará a la línea con ese número.
- Si al pulsar Ctrl + P escribimos #, nos mostrará todas las etiquetas de un documento HTML.
Múltiples cursores
- Pulsando Ctrl y haciendo click sobre las lineas, podemos insertar múltiples cursores y cambiar o añadir contenido a la vez.
Modo anti-distracción
- Para entrar en el modo anti-distracción, puedes pulsar Shift + F11. Esto centrara el código y lo pondrá a "Full Screen".
Para más información visitar las siguientes URL con ejemplos de ST3:
- http://www.emezeta.com/articulos/guia-sublime-text
- http://foro.elhacker.net/desarrollo_web/tips_y_trucos_sublime_text_2-t364397.0.html
Configuración del instalador de paquetes en Sublime Text 3
Una vez instalado Sublime Text 3 vamos a configurar el sistema que nos permitirá instalar componentes adicionales. Ese sistema es el package control.
Para instalar el package control haremos lo siguiente:
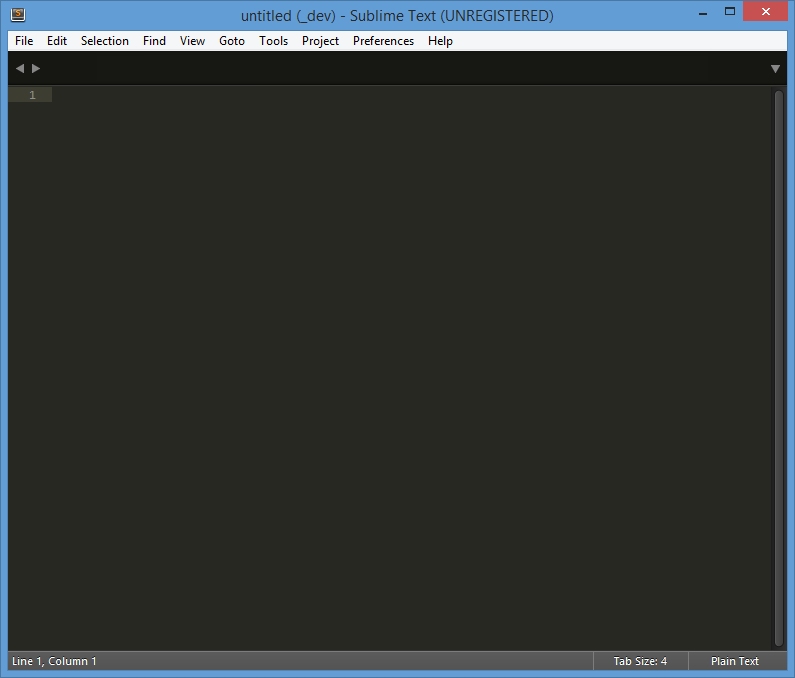
- Abrimos Sublime Text y veremos el siguiente aspecto:
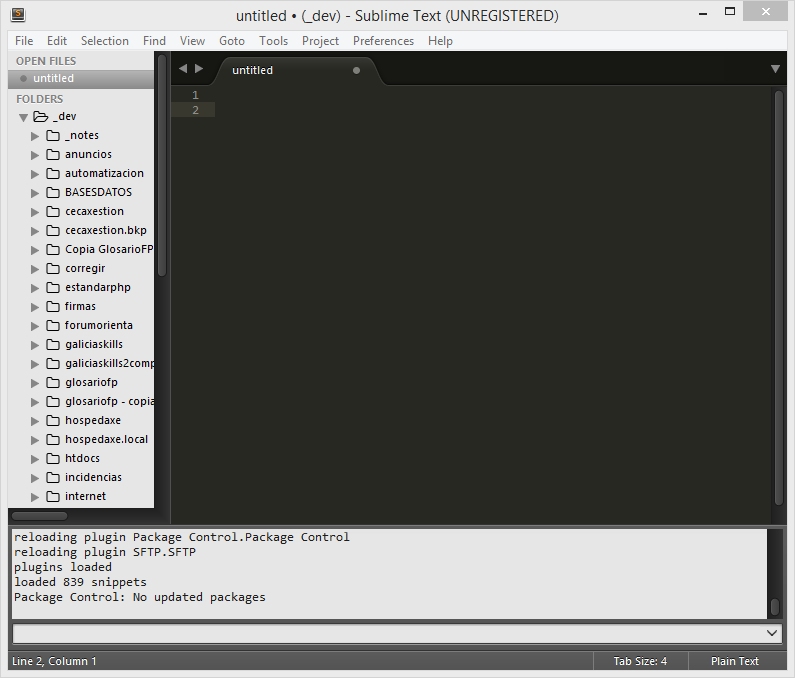
- Activamos que se muestre la barra lateral en el menú View -> Side Bar -> Show Side Bar.
- Si no se activa el Side Bar pulsar en la opción View -> Side Bar ->Show Open Files .
- Mostraremos la consola con View -> Console.
- Iremos a la siguiente página: https://sublime.wbond.net/
- Pulsaremos en la opción Install Now >
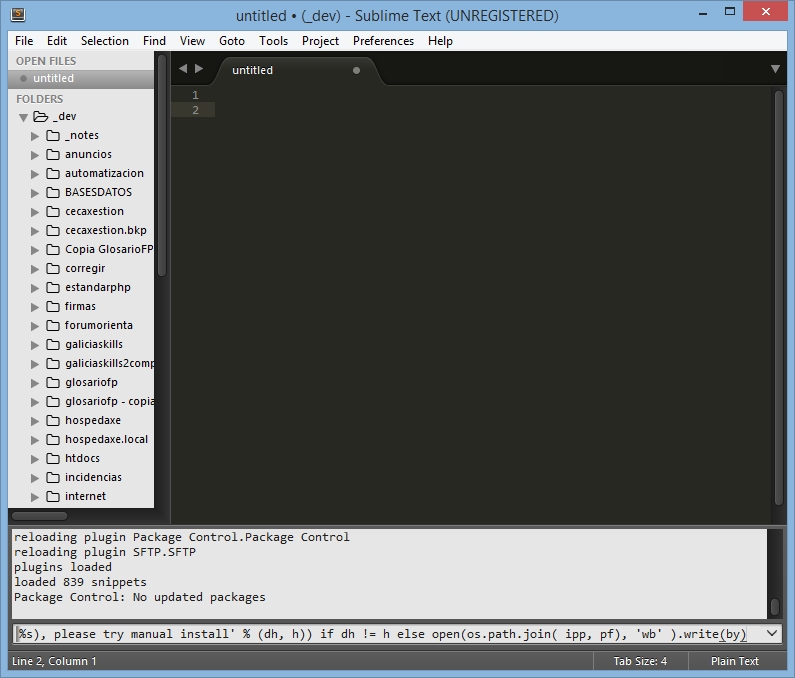
- Seleccionamos el texto indicado para nuestra versión y lo copiamos.
- Vamos a la consola de Sublime Text y lo pegamos.
- Pulsaremos Enter y esperaremos a que el sistema actualice los repositorios.
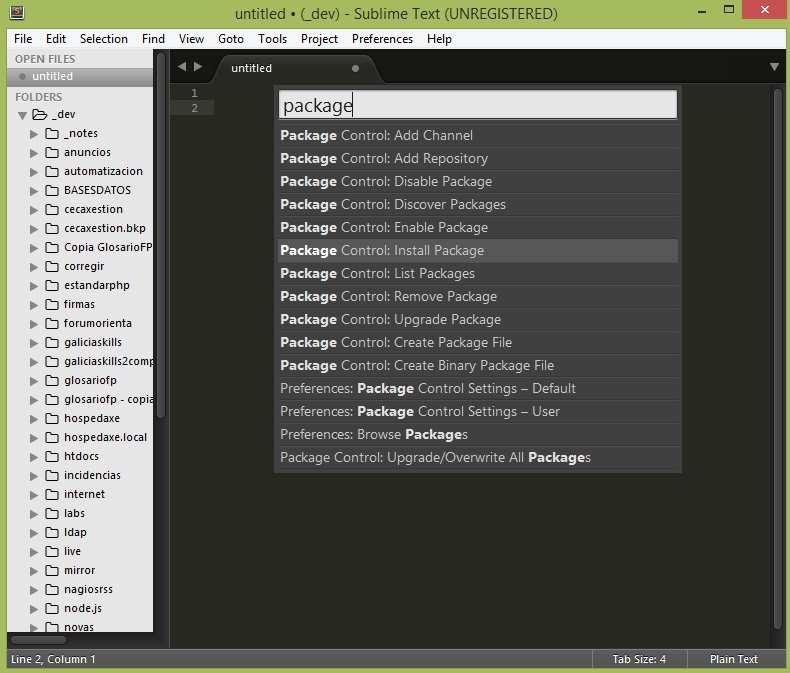
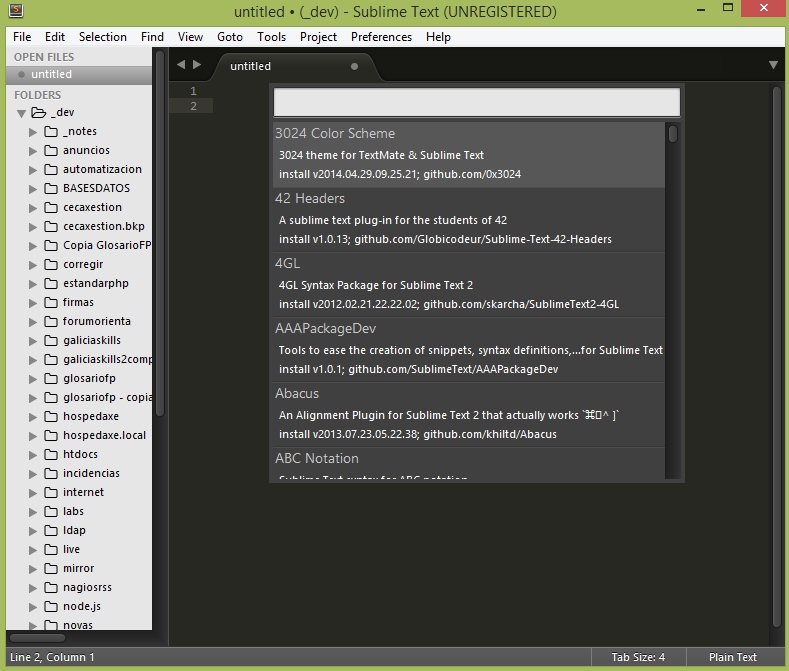
- Para acceder al package control iremos a Tools -> Command Palette (CTRL + Shift + P) y una vez allí teclearemos package y seleccionamos Package Control: Install Package
- Una vez en el package manager podremos buscar en la lista el plugin que queramos instalar.
Configuración de cliente FTP en Sublime Text 3
En Sublime Text podemos configurar un cliente FTP que nos permitirá enviar nuestros ficheros al servidor de forma automática cada vez que grabamos el fichero.
- Para ello abriremos el Package Control con CTRL + Shift + P , teclearemos package y seleccionamos Package Control: Install Package
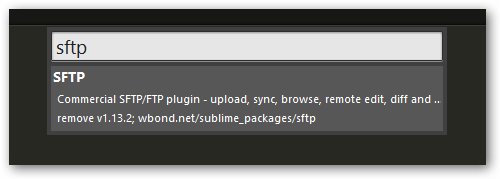
- Tecleamos SFTP y lo seleccionamos:
- Una vez instalado configuraremos el plugin de la siguiente forma:
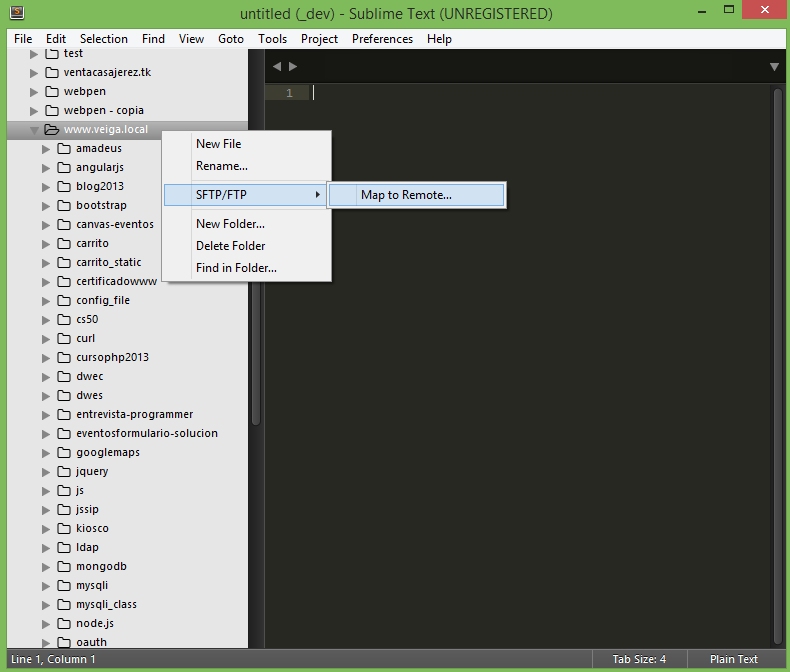
- En la vista lateral click con el botón derecho en la carpeta principal en la que queremos configurar nuestro FTP automático y seleccionaremos la opción SFTP/FTP: Map to Remote...
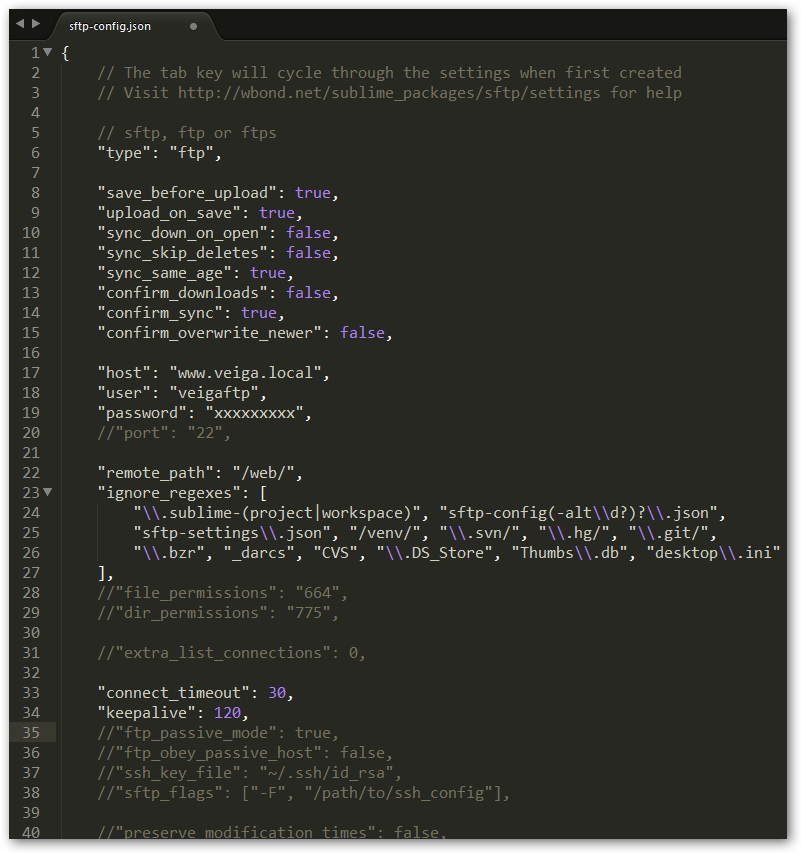
- Configuraremos las siguientes opciones según nuestros parámetros:
Instalación de plugin SideBarEnhancements en Sublime Text 3
Si queremos probar nuestras páginas en un navegador por defecto y en una URL determinada haremos lo siguiente:
- Tendremos que instalarnos primero el plugin: SideBarEnhancements.
- Para ello pulsaremos CTRL + Shift + P teclearemos install y seleccionamos Package Control: Install Package
- Tecleamos SideBarEnhancements
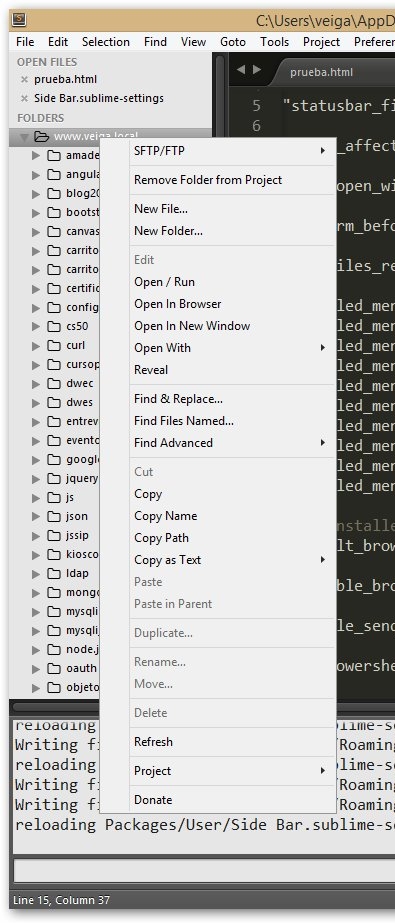
- Una vez instalado el plugin en el SideBar cuando pulsemos con el botón derecho nos aparecerán más opciones de gestión de ficheros adicionales.
- A continuación tendremos que configurar la URL dónde queremos que se abran nuestras páginas de prueba.
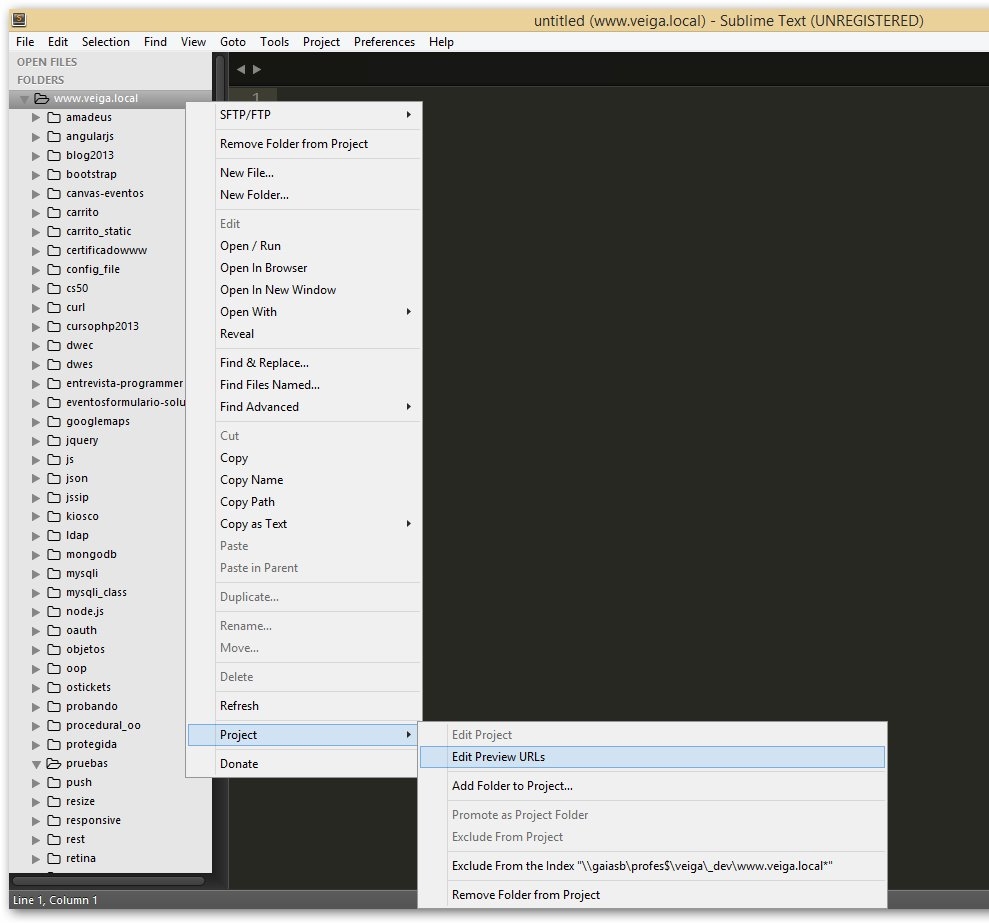
- Haremos click con el botón derecho del ratón en la carpeta principal equivalente a la raíz en nuestro servidor web y seleccionaremos Project -> Edit Preview URLs
- Editaremos el fichero con las rutas dónde se encuentran nuestros ficheros locales (en nuestra carpeta personal L: (fijarse que la ruta termina con /)
- Al pulsar la tecla F12 se abrirá el servidor de Testing.
- Al pulsar la tecla ALt+F12 se abrirá el servidor de Producción.
Ejemplo de código de SideBarEnhancements.json:
{
	"E:/xampp/htdocs/web/_dev/www.veiga.local/": {
		"url_testing":"http://localhost/web/www.veiga.local/",
		"url_production":"http://localhost/web/www.veiga.local/"
	},
	"E:/xampp/htdocs/dominio.local": {
		"url_testing":"http://www.dominio.local/",
		"url_production":"http://www.dominio.local/"
	}
}

// Si da error en la ruta poniendo la letra de la unidad,
// Sustituir por la ruta de la conexion Por ejemplo: //gaiasa/dawMP/webservidor/www.veiga.local
- Grabaremos el fichero con CTRL+S.
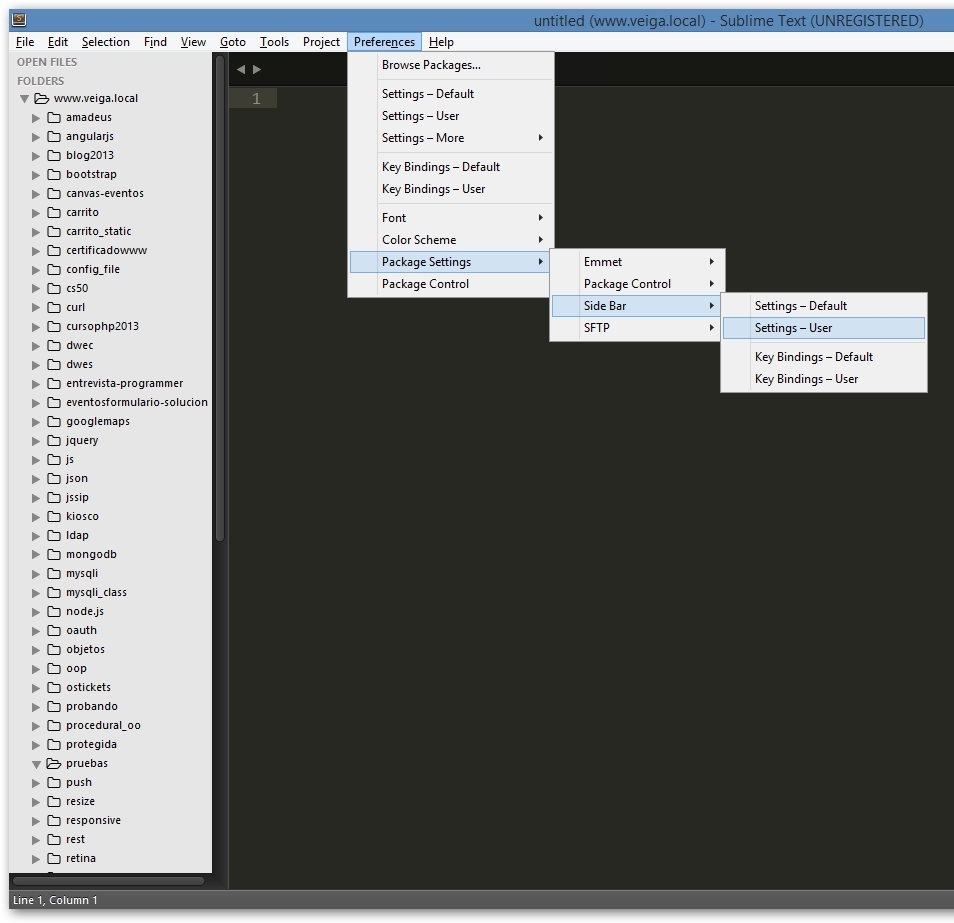
- Iremos a Preferences -> Package Settings -> Side Bar -> Settings User
Ejemplo de código de SideBar.sublime-settings.json a incluir en Preferences -> Package Settings -> Side Bar -> Settings User:
{
	"default_browser": "",
	"portable_browser": "C:/Program Files (x86)/Google/Chrome/Application/chrome.exe"
}
- Iremos a Preferences -> Key Bindings - User
- El código para el fichero anterior se puede copiar de Preferences -> Package Settings -> Side Bar -> Key Bindings - Default
Ejemplo de código de Default(windows).sublime-keymap.json:
[
	{ "keys": ["shift+f6"],
		"command": "side_bar_open_in_browser" ,
		"args":{"paths":[], "type":"production", "browser":""}
	}
]

// Se ha configurado para que abra con la misma combinación de teclas que NetBeans Shift+F6.
Reindentar código con CodeFormatter en Sublime Text 3
Una forma de reindentar el código es la siguiente:
- Seleccionar todo el código con CTRL + A
- Ir a Edit -> Line -> Reindent
- También podemos crear una combinación de teclas:
{ "keys": ["ctrl+shift+r"],
	"command": "reindent" ,
	"args": { "single_line": false }
}
- Otra forma es usar un paquete adicional. En este caso instalaremos el paquete CodeFormatter:
- Pulsar Ctrl+Mayusculas+P y teclear install para instalar el paquete: CodeFormatter
- Una vez instalado, podremos configurar todas sus opciones en Preferences -> Package Settings -> CodeFormatte -> Settings - Default:
- Aquí se muestra un ejemplo de configuración:
{
    "codeformatter_debug": false,

    "codeformatter_go_options": {
        "syntaxes": "go",
        "format_on_save": true // Format on save. Either a boolean (true/false) or a string regexp tested on filename. Example : "^((?!.min.|vendor).)*$"
        // Optionless support
    },

    "codeformatter_php_options": {
        "syntaxes": "php", // Syntax names which must process PHP formatter
        "php_path": "", // Path for PHP executable, e.g. "/usr/lib/php" or "C:/Program Files/PHP/php.exe". If empty, uses command "php" from system environments
        "format_on_save": true, // Format on save. Either a boolean (true/false) or a string regexp tested on filename. Example : "^((?!.min.|vendor).)*$"
        "php55_compat": false, // PHP 5.5 compatible mode
        "psr1": false, // Activate PSR1 style
        "psr1_naming": false, // Activate PSR1 style - Section 3 and 4.3 - Class and method names case
        "psr2": true, // Activate PSR2 style
        "indent_with_space": 4, // Use spaces instead of tabs for indentation
        "enable_auto_align": true, // Enable auto align of = and =>
        "visibility_order": true, // Fixes visibility order for method in classes - PSR-2 4.2
        "smart_linebreak_after_curly": true, // Convert multistatement blocks into multiline blocks

        // Enable specific transformations. Example: ["ConvertOpenTagWithEcho", "PrettyPrintDocBlocks"]
        // You can list all available transformations from command palette: CodeFormatter: Show PHP Transformations
        "passes": [],

        // Disable specific transformations
        "excludes": []
    },

    "codeformatter_js_options": {
        "syntaxes": "javascript,json", // Syntax names which must process JS formatter
        "format_on_save": true, // Format on save. Either a boolean (true/false) or a string regexp tested on filename. Example : "^((?!.min.|vendor).)*$"
        "indent_size": 4, // indentation size
        "indent_char": " ", // Indent character
        "indent_with_tabs": false, // Indent with one tab (overrides indent_size and indent_char options)
        "eol": "\n", // EOL symbol
        "preserve_newlines": true, // whether existing line breaks should be preserved,
        "max_preserve_newlines": 3, // maximum number of line breaks to be preserved in one chunk
        "space_in_paren": false, // Add padding spaces within paren, ie. f( a, b )
        "space_in_empty_paren": false, // Add padding spaces within paren if parent empty, ie. f(  )
        "e4x": false, // Pass E4X xml literals through untouched
        "jslint_happy": false, // if true, then jslint-stricter mode is enforced. Example function () vs function()
        "space_after_anon_function": false, // Space after anonimouse functions
        "brace_style": "collapse", // "collapse" | "expand" | "end-expand". put braces on the same line as control statements (default), or put braces on own line (Allman / ANSI style), or just put end braces on own line.
        "keep_array_indentation": false, // keep array indentation.
        "keep_function_indentation": false, // keep function indentation.
        "eval_code": false, // eval code
        "unescape_strings": false, // Decode printable characters encoded in xNN notation
        "wrap_line_length": 0, // Wrap lines at next opportunity after N characters
        "unindent_chained_methods": false, // Unindent chained method calls
        "break_chained_methods": false, // Break chained method calls across subsequent lines
        "end_with_newline": false, // Add new line at end of file
        "comma_first": false, // Add comma first
        "operator_position": "before-newline" // Operator position: before-newline, after-newline, preserve-newline
    },

    "codeformatter_css_options": {
        "syntaxes": "css,less", // Syntax names which must process CSS formatter
        "format_on_save": false, // Format on save. Either a boolean (true/false) or a string regexp tested on filename. Example : "^((?!.min.|vendor).)*$"
        "indent_size": 4, // Indentation size
        "indent_char": " ", // Indentation character
        "indent_with_tabs": false, // Indent with one tab (overrides indent_size and indent_char options)
        "selector_separator_newline": false, // Add new lines after selector separators
        "end_with_newline": false, // Add new line of end in file
        "newline_between_rules": false, // Add new line between rules
        "space_around_combinator": false, // Space around combinator
        "eol": "\n" // EOL symbol
    },

    "codeformatter_scss_options": {
        "syntaxes": "scss,sass", // Indentation size
        "format_on_save": false, // Format on save. Either a boolean (true/false) or a string regexp tested on filename. Example : "^((?!.min.|vendor).)*$"
        "indent_size": 4, // Indentation size
        "indent_char": " ", // Indentation character
        "indent_with_tabs": false, // Indent with one tab (overrides indent_size and indent_char options)
        "selector_separator_newline": false, // Add new lines after selector separators
        "end_with_newline": false, // Add new line of end in file
        "newline_between_rules": false, // Add new line between rules
        "space_around_combinator": false, // Space around combinator
        "eol": "\n" // EOL symbol
    },

    "codeformatter_html_options": {
        "syntaxes": "html,blade,asp,xml", // Syntax names which must process HTML formatter
        "format_on_save": true, // Format on save. Either a boolean (true/false) or a string regexp tested on filename. Example : "^((?!.min.|vendor).)*$"
        "formatter_version": "regexp", // Which formatter to use. Current options are "bs4" and "regexp". If an error occurs while loading the bs4 formatter, the regexp formatter will automatically be used
        "indent_size": 4, // indentation size
        "indent_char": " ", // Indentation character
        "indent_with_tabs": false, // Indent with one tab (overrides indent_size and indent_char options)
        "exception_on_tag_mismatch": false, // If the last closing tag is not at the same indentation level as the first opening tag, there's probably a tag mismatch in the file
        "expand_javascript": false, // (Under construction) Expand JavaScript inside of <script> tags (also affects CSS purely by coincidence)
        "expand_tags": false, // Expand tag attributes onto new lines
        "minimum_attribute_count": 2, // Minimum number of attributes needed before tag attributes are expanded to new lines
        "first_attribute_on_new_line": false, // Put all attributes on separate lines from the tag (only uses 1 indentation unit as opposed to lining all attributes up with the first)
        "reduce_empty_tags": true, // Put closing tags on same line as opening tag if there is no content between them
        "reduce_whole_word_tags": true, // Put closing tags on same line as opening tag if there is whole word between them
        "custom_singletons": "" // Custom singleton tags for various template languages outside of the HTML5 spec
    },

    "codeformatter_python_options": {
        "syntaxes": "python", // Syntax names which must process Python formatter
        "format_on_save": false, // Format on save. Either a boolean (true/false) or a string regexp tested on filename. Example : "^((?!.min.|vendor).)*$"
        "indent_size": 1, // indentation size
        "indent_with_tabs": true, // Indent with tabs or spaces
        "max_char": 80, // Width of output lines in characters.
        "assignment": " = ", // This is how the assignment operator is to appear.
        "function_param_assignment": "=", // This is how function-parameter assignment should appear.
        "function_param_sep": ", ", // This is how function parameters are separated.
        "list_sep": ", ", // This is how list items are separated.
        "subscript_sep": "=", // This is how subscripts are separated.
        "dict_colon": ": ", // This separates dictionary keys from values.
        "slice_colon": ":", // this separates the start:end indices of slices.
        "comment_prefix": "# ", // This is the sentinel that marks the beginning of a commentary string.
        "shebang": "#!/usr/bin/env python", // Hashbang, a line-one comment naming the Python interpreter to Unix shells.
        "boilerplate": "", // Standard code block (if any). This is inserted after the module doc string on output.
        "blank_line": "", // This is how a blank line is to appear (up to the newline character).
        "keep_blank_lines": true, // If true, preserve one blank where blank(s) are encountered.
        "add_blank_lines_around_comments": true, // If true, set off comment blocks with blanks.
        "add_blank_line_after_doc_string": true, // If true, add blank line after doc strings.
        "max_seps_func_def": 3, // Split lines containing longer function definitions.
        "max_seps_func_ref": 5, // Split lines containing longer function calls.
        "max_seps_series": 5, // Split lines containing longer lists or tuples.
        "max_seps_dict": 3, // Split lines containing longer dictionary definitions.
        "max_lines_before_split_lit": 2, // Split string literals containing more newline characters.
        "left_margin": "", // This is how the left margin is to appear.
        "normalize_doc_strings": false, // If true, normalize white space in doc strings.
        "leftjust_doc_strings": false, // If true, left justify doc strings.
        "wrap_doc_strings": false, // If true, wrap doc strings to max_char.
        "leftjust_comments": false, // If true, left justify comments.
        "wrap_comments": false, // If true, wrap comments to max_char.
        "double_quoted_strings": false, // If true, use quotes instead of apostrophes for string literals.
        "single_quoted_strings": false, // If true, use apostrophes instead of quotes for string literals.
        "can_split_strings": false, // If true, longer strings are split at the max_char.
        "doc_tab_replacement": "....", // This literal replaces tab characters in doc strings and comments.

        // Optionally preserve unassigned constants so that code to be tidied
        // may contain blocks of commented-out lines that have been no-op'ed
        // with leading and trailing triple quotes.  Python scripts may declare
        // constants without assigning them to a variables, but CodeFormatter
        // considers this wasteful and normally elides them.
        "keep_unassigned_constants": false,

        // Optionally omit parentheses around tuples, which are superfluous
        // after all.  Normal CodeFormatter behavior will be still to include them
        // as a sort of tuple display analogous to list displays, dict
        // displays, and yet-to-come set displays.
        "parenthesize_tuple_display": true,

        // When CodeFormatter splits longer lines because max_seps
        // are exceeded, the statement normally is closed before the margin is
        // restored.  The closing bracket, brace, or parenthesis is placed at the
        // current indent level.  This looks ugly to "C" programmers.  When
        // java_style_list_dedent is True, the closing bracket, brace, or
        // parenthesis is brought back left to the indent level of the enclosing
        // statement.
        "java_style_list_dedent": false
    },

    "codeformatter_vbscript_options": {
        "syntaxes": "vbscript", // Syntax names which must process VBScript formatter
        "format_on_save": false, // Format on save. Either a boolean (true/false) or a string regexp tested on filename. Example : "^((?!.min.|vendor).)*$"
        "indent_size": 1, // indentation size
        "indent_char": "\t", // Indentation character
        "indent_with_tabs": true, // Indent with one tab (overrides indent_size and indent_char options)
        "preserve_newlines": true, // Preserve existing line-breaks
        "max_preserve_newlines": 10, // Maximum number of line-breaks to be preserved in one chunk
        "opening_tags": "^(Function .*|Sub .*|If .* Then|For .*|Do While .*|Select Case.*)", // List of keywords which open a new block
        "middle_tags": "^(Else|ElseIf .* Then|Case .*)$", // List of keywords which divide a block, but neither open or close the block
        "closing_tags": "(End Function|End Sub|End If|Next|Loop|End Select)$" // List of keywords which close an open block
    },

    "codeformatter_coldfusion_options": {
        "syntaxes": "coldfusion,cfm,cfml", // Syntax names which must process Coldfusion Markup Language formatter
        "format_on_save": false, // Format on save. Either a boolean (true/false) or a string regexp tested on filename. Example : "^((?!.min.|vendor).)*$"
        "indent_size": 2, // indentation size
        "indent_char": " ", // Indentation character
        "indent_with_tabs": false, // Indent with one tab (overrides indent_size and indent_char options)
        "exception_on_tag_mismatch": false, // If the last closing tag is not at the same indentation level as the first opening tag, there's probably a tag mismatch in the file
        "expand_javascript": false, // (Under construction) Expand JavaScript inside of <script> tags (also affects CSS purely by coincidence)
        "expand_tags": false, // Expand tag attributes onto new lines
        "minimum_attribute_count": 2, // Minimum number of attributes needed before tag attributes are expanded to new lines
        "first_attribute_on_new_line": false, // Put all attributes on separate lines from the tag (only uses 1 indentation unit as opposed to lining all attributes up with the first)
        "reduce_empty_tags": false, // Put closing tags on same line as opening tag if there is no content between them
        "reduce_whole_word_tags": false, // Put closing tags on same line as opening tag if there is whole word between them
        "custom_singletons": "" // Custom singleton tags for various template languages outside of the HTML5 spec
    }

}
- Cuando guardemos el archivo automáticamente se aplicarán las opciones correspondientes, según el lenguaje utilizado.
Comentar/descomentar código en Sublime Text 3
Una forma de reindentar el código es la siguiente:
- Para comentar/descomentar código de forma rápida podemos configurar la combinación de teclas CTRL+ 7.
- Vamos a Preferences -> Key Bindings
- Añadimos este objeto JSON al array que tengamos:
    { "keys": ["ctrl+7"], "command": "toggle_comment",
        "args": { "block": false }
    }
- Con lo que nos quedaría una combinación tal que así:
[{
    "keys": ["shift+f6"],
    "command": "side_bar_open_in_browser",
    "args": {
        "paths": [],
        "type": "production",
        "browser": ""
    }
}, {
    "keys": ["ctrl+shift+r"],
    "command": "reindent",
    "args": {
        "single_line": false
    }
}, {
	"keys": ["ctrl+7"],
	"command": "toggle_comment",
	"args": {
		"block": false
	}
}]
Auto ajuste de líneas largas (wrap) en Sublime Text 3
Para auto ajustar las líneas largas que se salgan del editor haremos lo siguiente:
- Preferences > Settings – User.
- Introduciremos la siguiente línea: "word_wrap": true,
{
	"word_wrap": true,
	"ignored_packages":
	[
		"Vintage"
	]
}
- Grabaremos el archivo con CTRL + S.
Plugin Emmet en Sublime Text 3
Este plugin nos ayudará a generar código de forma rápida
Para instalarlo:
- CTRL+ Shift + P y tecleamos install y seleccionamos Package Control: Install Package.
- Escribimos emmet y en los resultados que aparezcan pulsamos en Emmet.
- Una vez instalado creamos un fichero html y podemos probar combinaciones como las siguientes:
- ! [TAB] -> Escribe la cabecera de un documento HTML5
- div>ul>li -> Genera un div que contiene un ul y un li
- Para más información y ejemplos visitar: http://docs.emmet.io/
Plugin Bootstrap 3 Snippets en Sublime Text 3
Este plugin nos permitirá autocompletar código de Bootstrap:
Para instalarlo:
- CTRL+ Shift + P y tecleamos install y seleccionamos Package Control: Install Package.
- Escribimos bootstrap y en los resultados que aparezcan pulsamos en Bootstrap 3 Snippets.
- Para probar su funcionamiento abrimos un fichero nuevo y probamos a teclear alguna combinación de las disponibles en:
https://github.com/JasonMortonNZ/bs3-sublime-plugin
// Para generar un formulario en bootstrap:
bs3-form + [TAB]

// Para escribir un campo de tipo input text:
bs3-input:text + [TAB]

// Para escribir un campo de tipo input date:
bs3-input:date + [TAB]

// Más ejemplos en: https://github.com/JasonMortonNZ/bs3-sublime-plugin
Plugin BracketHighlighter en Sublime Text 3
Este plugin nos ayudará a localizar más fácilmente la apertura y cierre de etiquetas, funciones, etc..
Para instalarlo:
- CTRL+ Shift + P y tecleamos install y seleccionamos Package Control: Install Package.
- Escribimos bracket y en los resultados que aparezcan pulsamos en BracketHighlighter.
- Una vez instalado abrimos un fichero y probamos en un fichero con código a ver si marca las aperturas y cierres correctamente.
- A veces dependiendo de la combinación de colores podrá destacarlo más o menos.
Plugin ColorPicker en Sublime Text 3
Este plugin nos permitirá seleccionar colores desde el código fuente:
Para instalarlo:
- CTRL+ Shift + P y tecleamos install y seleccionamos Package Control: Install Package.
- Escribimos colorpi y en los resultados que aparezcan pulsamos en ColorPicker.
- Para probar su funcionamiento teclearemos CTRL+Shift+C
Plugin DocBlockr en Sublime Text 3
Este plugin nos permitirá crear documentación sobre el código fuente:
Para instalarlo:
- CTRL+ Shift + P y tecleamos install y seleccionamos Package Control: Install Package.
- Escribimos docbl y en los resultados que aparezcan pulsamos en DocBlockr.
- Para probar su funcionamiento simplemente tendremos que escribir /** y pulsar TAB encima de una función.
Ejemplo:
/**[TAB]
function sumar(a,b)
{
	return a+b;
}

// Y obtendremos algo como:
/**
 * [sumar description]
 * @param  {[type]} a
 * @param  {[type]} b
 * @return {[type]}
 */
function sumar(a,b)
{
	return a+b;
}


// Tendremos que completar la documentación cubriendo cada apartado y pulsando [TAB] para pasar al siguiente.
// Y generaremos un código similar al ejemplo siguiente:
/**
 * Función que devuelve la suma de dos números pasados como parámetro.
 * @param  {number} a
 * @param  {number} b
 * @return {number}
 */
function sumar(a,b)
{
	return a+b;
}
Plugin HTML-CSS-JS Prettify en Sublime Text 3
- CTRL+ Shift + P y tecleamos install y seleccionamos Package Control: Install Package.
- Escribimos html css y en los resultados que aparezcan pulsamos en HTML-CSS-JS Prettify.
- Para probar su funcionamiento simplemente tendremos que hacer click con el botón derecho en el código y seleccionar HTML/CSS/JS Prettify -> Prettify Code
Plugin Typescript para trabajar con Angular2 en Sublime Text 3
- CTRL+ Shift + P y tecleamos install y seleccionamos Package Control: Install Package.
- Escribimos TypeScript y en los resultados que aparezcan pulsamos en TypeScript.
- Reiniciamos Sublime y ya podremos ver con colores el código de TypeScript.
- Si queremos configurar el tamaño del tabulador en espacios y alguna que otra opción iremos a:
- Preferences > Settings > Syntax Specific (User) y pegaremos el siguiente código:
{
  "tab_size": 3,
  "translate_tabs_to_spaces": false
}
Plugin Laravel Blade Highlighter en Sublime Text 3
Este plugin nos permitirá poner de diferente color las plantillas Blade de Laravel:
Para instalarlo:
- CTRL+ Shift + P y tecleamos install y seleccionamos Package Control: Install Package.
- Escribimos laravel y en los resultados que aparezcan pulsamos en Laravel Blade Highlighter.
Plugin Laravel Color Scheme en Sublime Text 3
Este plugin nos permitirá poner de diferente color código generado en Laravel:
Para instalarlo:
- CTRL+ Shift + P y tecleamos install y seleccionamos Package Control: Install Package.
- Escribimos laravel y en los resultados que aparezcan pulsamos en Laravel Color Scheme.
Plugin PHP Getters and Setters en Sublime Text 3
Este plugin nos permitirá crear los getters and setters en PHP a la hora de hacer una clase.:
Para instalarlo:
- CTRL+ Shift + P y tecleamos install y seleccionamos Package Control: Install Package.
- Escribimos PHP Getters y en los resultados que aparezcan pulsamos en PHP Getters and Setters.
- Para probar su funcionamiento simplemente tendremos que pulsar con el botón derecho Getters and Setters en el código PHP dónde tenemos la clase y seleccionar la opción deseada.
Plugin PHPcs en Sublime Text 3
Da soporte a PHP_CodeSniffer ST2. Chequea si el código sigue el stándard. Se puede seleccionar Zend, PEAR,etc.. Para más configuración: http://pear.php.net/package/PHP_CodeSniffer/redirected
Para instalarlo:
- CTRL+ Shift + P y tecleamos install y seleccionamos Package Control: Install Package.
- Escribimos PHP Construc y en los resultados que aparezcan pulsamos en PHPcs.
Plugin PHP Constructors en Sublime Text 3
Este plugin nos permitirá crear los constructores de una clase en PHP.:
Para instalarlo:
- CTRL+ Shift + P y tecleamos install y seleccionamos Package Control: Install Package.
- Escribimos PHP Construc y en los resultados que aparezcan pulsamos en PHP Constructors.
- Para probar su funcionamiento simplemente tendremos que pulsar con el botón derecho PHP Constructor y seleccionar Generate PHP Constructor for Class.
Plugin Pretty JSON en Sublime Text 3
Este plugin nos permitirá validar, formatear y minimizar un JSON:
Para instalarlo:
- CTRL+ Shift + P y tecleamos install y seleccionamos Package Control: Install Package.
- Escribimos pretty y en los resultados que aparezcan pulsamos en Pretty JSON.
- Para configurar la combinación de teclas iremos a Preferences -> Package Settings -> PretyJSON-> Settings - User
- Y añadimos lo siguiente:
{ "keys": [ "ctrl+alt+m" ], "command": "un_pretty_json" }
- Para usarlo seleccionaremos el texto JSON y pulsaremos CTRL+ALT+M
- También podremos validar y formatear. Pulsamos CTRL + Shift + P, tecleamos JSON y veremos las opciones posibles y combinaciones de teclas correspondientes.
- Para formatear usaremos CTRL + Alt + J
Plugin EJS V2 Sublime Text 3
- Para que reconozca las plantillas con extensión .ejs, instalar el plugin EJS 2.
- CTRL+ Shift + P y tecleamos install y seleccionamos Package Control: Install Package.
- Escribimos EJS 2 y en los resultados que aparezcan pulsamos en EJS 2.
Plugin SublimeCodeIntel en Sublime Text 3
Este plugin nos permitirá autocompletar código en diferentes lenguajes:
Para instalarlo:
- CTRL+ Shift + P y tecleamos install y seleccionamos Package Control: Install Package.
- Escribimos codeIntel y en los resultados que aparezcan pulsamos en SublimeCodeIntel.
- Para probar su funcionamiento simplemente tendremos que escribir código de algún lenguaje y esperar a que nos muestre las opciones de autocompletado.
Más información sobre el plugin SublimeCodeIntel
Teclas rápidas con el plugin SublimeCodeIntel:
- ALT+Click (en una variable, nos lleva a la sección del código dónde se creó dicha variable.
- Shift+Control+Espacio (para mostrar las opciones de autocompletado para un texto determinado).
Para PHP tendremos que activar la opción de autocompletado en:
- Abrimos el siguiente fichero: Preferences -> Package Settings -> SublimeCodeIntel -> Settings - Default
- Copiamos todo su contenido.
- Lo pegamos en el siguiente fichero: Preferences -> Package Settings -> SublimeCodeIntel -> Settings - User
- Modificamos esta línea para que quede así, 'añadiendo PHP en la última posición:
 "codeintel_selected_catalogs": [
        "PHP", "jQuery", "HTML5"
    ],
- Grabamos el archivo con nuestros ajustes y reiniciamos el Sublime Text 3.
Plugin SublimeLinter Sublime Text 3
Chequea constantemente si nos hemos olvidado de llaves, punto y coma, etc..
Para instalarlo:
- CTRL+ Shift + P y tecleamos install y seleccionamos Package Control: Install Package.
- Escribimos Sublime Linter y en los resultados que aparezcan pulsamos en Sublimelinter.
Hay que instalar módulos adicionales para cada lenguaje:
SublimeLinter-php
SublimeLinter-jshint
SublimeLinter-json
SublimeLinter-csslint
Plugin Terminal en Sublime Text 3
- CTRL+ Shift + P y tecleamos install y seleccionamos Package Control: Install Package.
- Escribimos terminal y en los resultados que aparezcan pulsamos en Terminal.
- Para probar su funcionamiento simplemente tendremos que hacer click con el botón derecho en alguna carpeta y seleccionar Open Terminal Here...
Plugin TrailingSpaces en Sublime Text 3
Se encarga de eliminar los espacios al final que tengamos en el código.
- CTRL+ Shift + P y tecleamos install y seleccionamos Package Control: Install Package.
- Escribimos terminal y en los resultados que aparezcan pulsamos en TrailingSpaces.
- Le asignaremos una combinación de teclas en Preferences -> Key Bindings -> User (delete_trailing_spaces):
[{
    "keys": ["shift+f6"],
    "command": "side_bar_open_in_browser",
    "args": {
        "paths": [],
        "type": "production",
        "browser": ""
    }
}, {
    "keys": ["ctrl+shift+r"],
    "command": "reindent",
    "args": {
        "single_line": false
    }
}, {
  	"keys": ["ctrl+shift+s"],
	"command": "delete_trailing_spaces"
}
]
- Para probar su funcionamiento simplemente tendremos que pulsar CTRL+Shift+S y se eliminarán automáticamente todos esos espacios al final.
Combinación de teclas para grabar todos los archivos en Sublime Text 3
Mediante esta combinación de teclas grabaremos todas las modificaciones de todos los archivos que tengamos abiertos en Sublime.
- CTRL+ Alt + S.
[{
    "keys": ["shift+f6"],
    "command": "side_bar_open_in_browser",
    "args": {
        "paths": [],
        "type": "production",
        "browser": ""
    }
}, {
    "keys": ["ctrl+shift+r"],
    "command": "reindent",
    "args": {
        "single_line": false
    }
}, {
    "keys": ["ctrl+alt+s"],
    "command": "save_all"
}, {
    "keys": ["ctrl+shift+b"],
    "command": "bracketeer_select"
}, {
    "keys": ["ctrl+7"],
    "command": "toggle_comment",
    "args": {
        "block": false
    }
}]
- Para probar su funcionamiento simplemente tendremos que pulsar CTRL+Shift+S y se eliminarán automáticamente todos esos espacios al final.
Creación de un snippet en Sublime Text 3
Vamos a ver como podemos crear un snippet en Sublime Text 3 para que nos cubra la cabecera de Bootstrap al teclear bs y pulsar TABULADOR.
Para ello iremos a Tools -> New Snippet... y se mostrará el siguiente código:
<snippet>
	<content><![CDATA[
Hello, ${1:this} is a ${2:snippet}.
]]></content>
	<!-- Optional: Set a tabTrigger to define how to trigger the snippet -->
	<!-- <tabTrigger>hello</tabTrigger> -->
	<!-- Optional: Set a scope to limit where the snippet will trigger -->
	<!-- <scope>source.python</scope> -->
</snippet>
- Dentro de <![CDATA[ ... ]]> teclearemos el código fuente de nuestro snippet.
- Los parámetros ${1:this} y ${2:snippet} serán los textos que nos aparecerán cuando ejecutemos el snippet y pulsemos TABULADOR.
- ${1:this} : ${1} -> indica primer parámetro y :this -> indica texto por defecto en esa posición.
- <tabTrigger>hello</tabTrigger> -> Aquí se indica el texto previo que activará el snippet al pulsar TAB.
Código fuente de nuestro snippet para Bootstrap:
<snippet>
	<content><![CDATA[
<!DOCTYPE html>
<html lang="es">
<head>
	<meta charset="UTF-8">
	<title>${1:Titulo documento}</title>
	<meta name="viewport" content="width=device-width, initial-scale=1, maximum-scale=1">
	<link rel="stylesheet" href="css/bootstrap.min.css">
	<link rel="stylesheet" href="css/bootstrap-theme.min.css">
</head>
<body>
	${2: Contenido del documento}

	<script src="//ajax.googleapis.com/ajax/libs/jquery/2.1.1/jquery.min.js"></script>
</body>
</html>
]]></content>
	<!-- Optional: Set a tabTrigger to define how to trigger the snippet -->
	<tabTrigger>bs</tabTrigger>
	<!-- Optional: Set a scope to limit where the snippet will trigger -->
	<!-- <scope>source.python</scope> -->
</snippet>
Para guardar el fichero con el snippet:
- Carpeta: \Sublime Text 3\Packages\User
- Nombre: sin restricciones.
- Extensión: .sublime-snippet (es obligatoria, sino no funcionará el snippet).
Para probar el snippet:
- Teclear bs y pulsar TAB a continuación.
Configuración de Git en Sublime Text 3
http://scotch.io/tutorials/using-git-inside-of-sublime-text-to-improve-workflow
Configuración de Sublime Text 3 para seguir los estándares PSR-2
- Entraremos en Preferences -> Settings
- Copiamos y pegamos la siguiente configuración sobreescribiendo lo que tengamos.
{
	"default_line_ending": "unix",
	"ensure_newline_at_eof_on_save": true,
	"font_size": 12,
	"ignored_packages":
	[
		"Vintage"
	],
	"preserveIndent": "false",
	"rulers":
	[
		120
	],
	"tab_size": 4,
	"translate_tabs_to_spaces": true,
	"trim_trailing_white_space_on_save": true,
	"word_wrap": "true"
}
